What I Learned (and Fried) While Trying to Control a Motor with a Raspberry Pi
If you bought a Raspberry Pi and it’s been gathering dust, shame on you. And if you bought it with the noble intention of introducing your kids to computing and it’s now stuffed in a drawer beside two microSD cards and a barely used breadboard, then double shame.
The truth is, the Pi is more than just a cute little Linux box. It’s a window into how real-world systems work. Not spreadsheets or websites, but physical stuff. Motors, sensors, lights, alarms. The kind of technology that quietly powers everything from your car’s ABS system to your fridge to high-end military kit. You interact with it every day without even realising how much thought has gone into making it all work without catching fire.
This type of tinkering is known as physical computing. In simple terms, it’s when your code does something beyond the screen. Whether that’s turning on a light, spinning a motor or triggering a sensor, it’s the crossover between the digital and the physical. And once you start fiddling with it, it gets under your skin in a good way.
Start Here: The Book That Actually Helps
Before you start wiring up motors and setting things on fire, do yourself a favour and grab a copy of The Official Raspberry Pi Beginner’s Guide by Gareth Halfacree. It’s the best starting point out there. Clear, detailed and colourful enough to keep your kids interested, it explains the basics without assuming you’re trying to pass an electronics A-level. I used it in exactly the way you’re not supposed to — flipping to the bits I needed, reading a bit while something downloaded, then ignoring it until I hit another wall. It still worked. This is not the dry manual I had for BASIC back in the 80s. This is actually useful.

The Setup: Ditch the Tangle of Cables
My first attempt involved plugging in a monitor, a mini-HDMI cable, a keyboard, and a mouse. It looked like I was trying to reboot the space shuttle. After one too many accidental tugs that almost pulled the Pi off the desk, I ditched it and went headless using VNC Viewer. It’s a free bit of software that lets you access your Pi’s desktop from your main computer. Suddenly everything was easier, neater, and slightly more smug-feeling. No more cable spaghetti.

GPIO: The Tiny Pins That Do Big Things
Those little pins on the edge of the Pi aren’t there for decoration. GPIO stands for General Purpose Input/Output. Some pins can send signals, some can receive them, and a few can do both. They’re how your Pi talks to the outside world. You can use them to light up an LED, read input from a button, or control motors, as I discovered.
Here’s the catch — and it’s a big one. You can’t just run a motor straight from the GPIO pins. They don’t provide enough power. At best it won’t work, at worst you’ll fry something. Instead, the Pi sends a signal to an external component which controls a separate power supply. That’s how you get things moving without melting your board.
The Bit No One Tells You
This part surprised me. When you stop supplying power to a motor, it doesn’t just stop. It keeps spinning for a bit, and while it’s spinning, it turns into a tiny generator. That creates a backwards flow of electricity, known as back EMF, and if you’re not careful, that can damage your Pi. This is the exact same principle that hydroelectric power stations use to generate energy. It also quietly happens inside your car every time you brake, or in your fridge compressor, or your washing machine. All of these things have built-in protection to stop that current from flowing back into delicate circuits. You’ll need that too.
The H-Bridge: Making It All Work
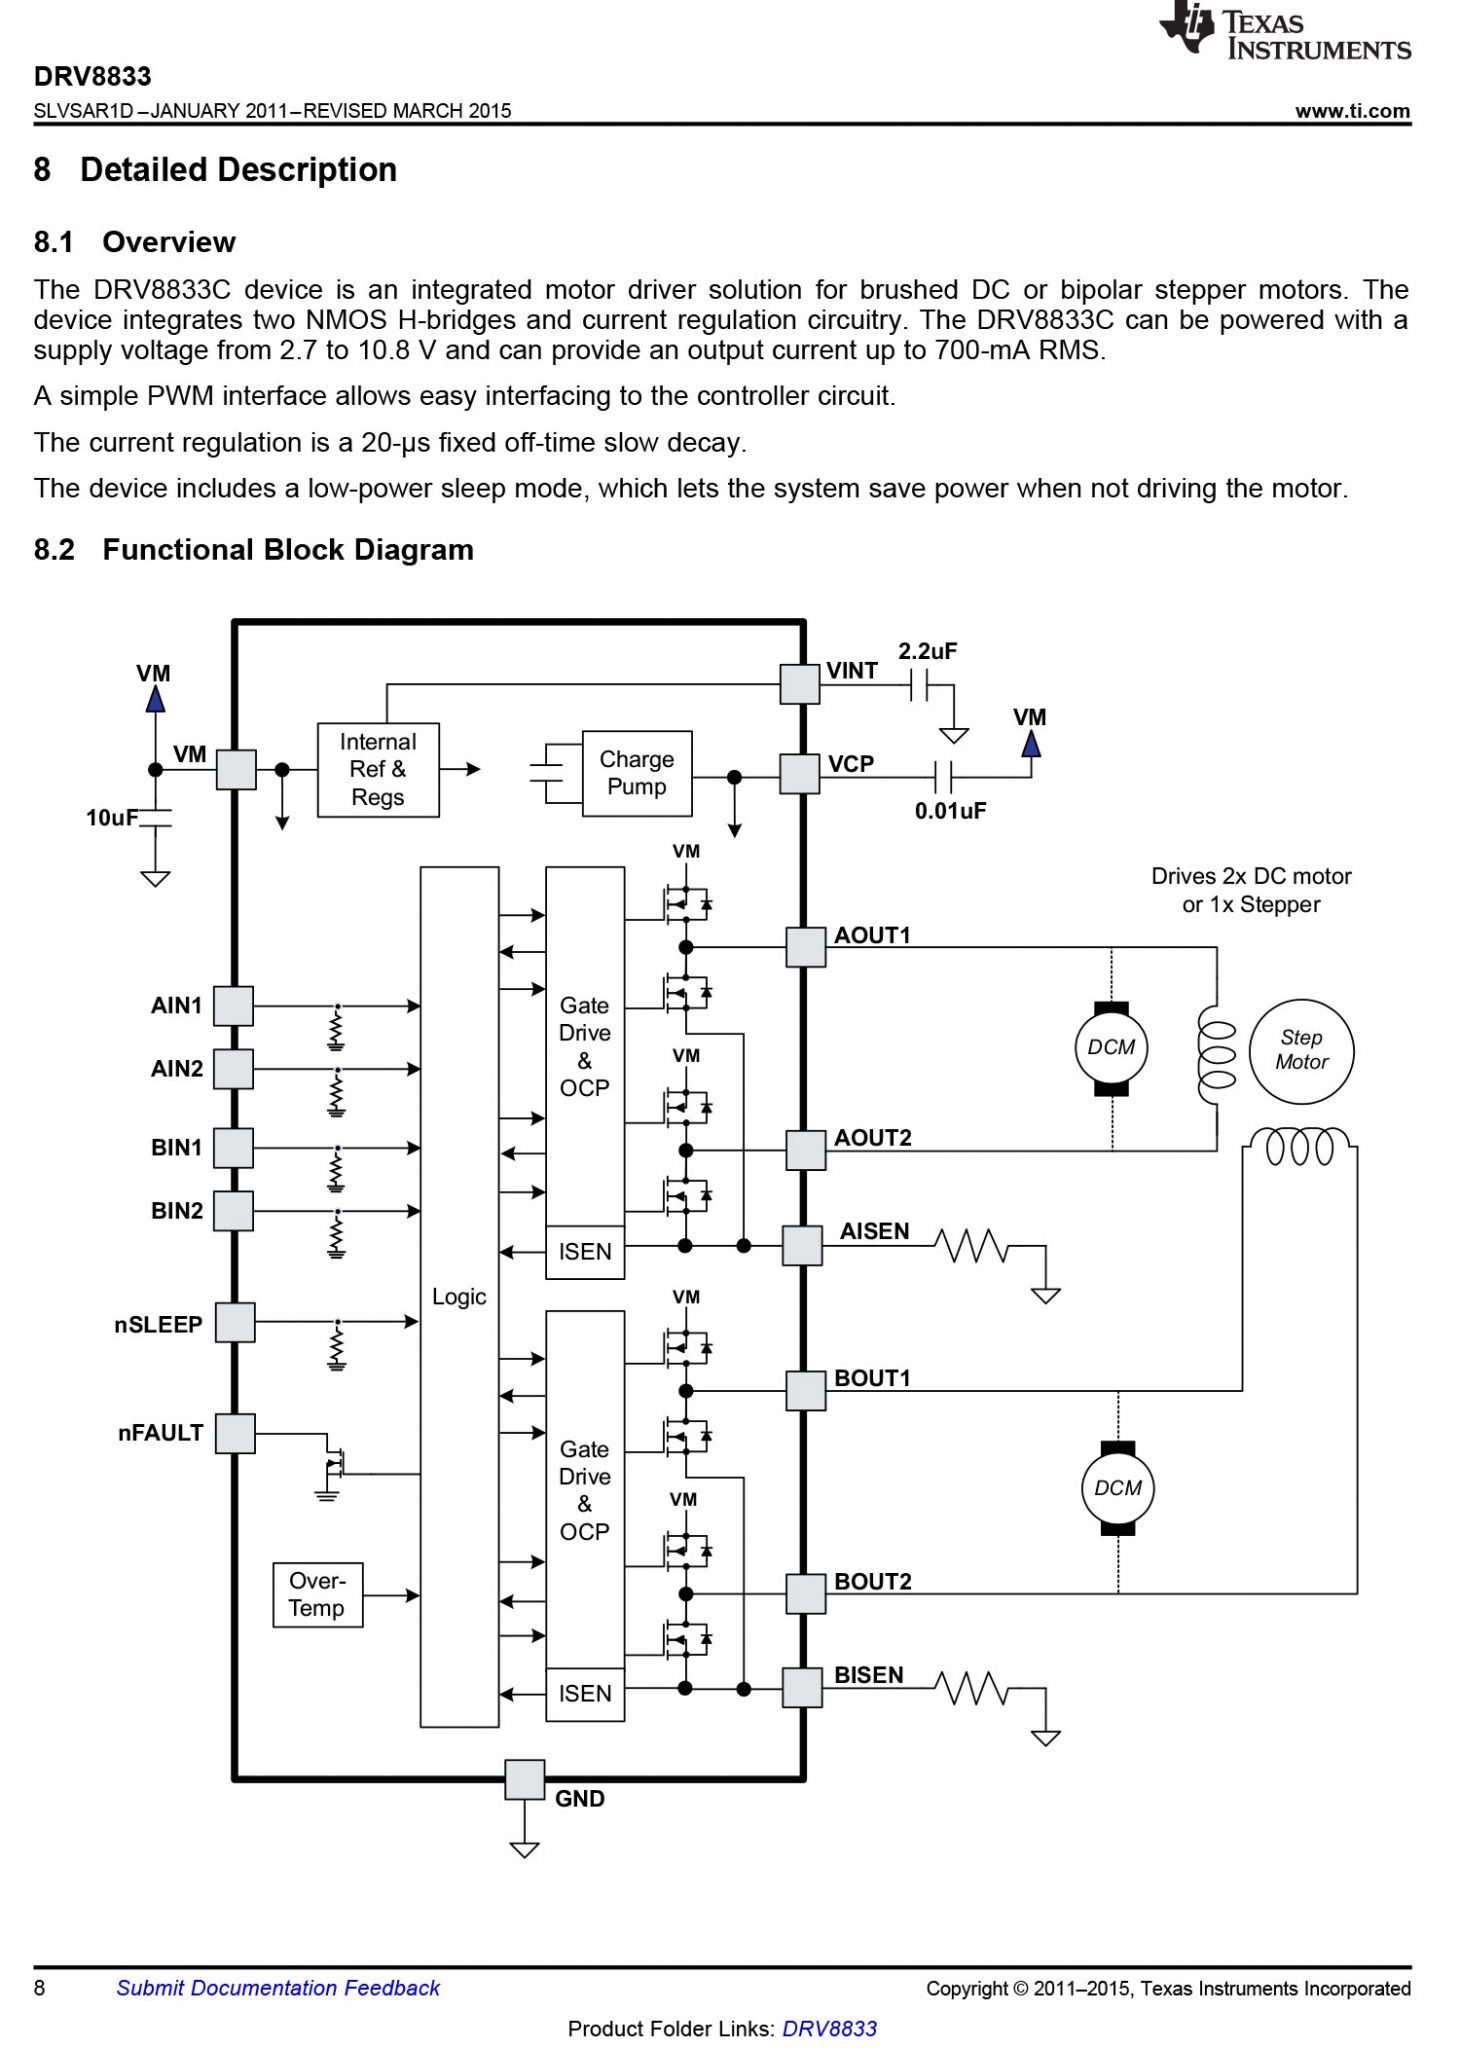
To solve this, I used an Adafruit DRV8833 H-Bridge motor driver board. It’s a small but clever bit of kit that takes signals from the Pi and switches the motor on or off, and also controls its direction. More importantly, it handles all the protection stuff I just mentioned. It prevents damage from reverse currents and allows you to power your motor from a proper battery source rather than expecting your Pi to do all the heavy lifting. Think of it as a translator and bodyguard in one.
For those of you who are really keen, or maybe just know about these things somehow, here’s the technical sheet for the H Bridge, which I got from the manufacturer’s website. On first glance, it made no sense, but after a while, you can start to figure stuff out – like the voltage control Vm, then there’s the elements which connect the two motors, so there’s going to be two pairs of these, which have to be the AIN1 and AIN2 and BIN1 and BIN2.
The Wiring and Code
Once everything was connected — Pi, H-Bridge, motor, and a cheap AA battery pack — I fired up Thonny Python (which comes pre-installed on the Pi) and dropped in the following code. I’ve added comments so you can follow what it’s doing.
import RPi.GPIO as GPIO
import time
import random
# Define GPIO pins
AIN1 = 17 # Motor direction control
AIN2 = 27 # Motor direction control
STBY = 22 # Standby must be HIGH
# GPIO setup
GPIO.setmode(GPIO.BCM)
GPIO.setup(AIN1, GPIO.OUT)
GPIO.setup(AIN2, GPIO.OUT)
GPIO.setup(STBY, GPIO.OUT)
# Enable the motor driver
GPIO.output(STBY, GPIO.HIGH)
# Define motor functions
def motor_forward(duration):
GPIO.output(AIN1, GPIO.HIGH)
GPIO.output(AIN2, GPIO.LOW)
time.sleep(duration)
motor_stop()
def motor_stop():
GPIO.output(AIN1, GPIO.LOW)
GPIO.output(AIN2, GPIO.LOW)
SMALL_MOVE_TIME = 0.2
FULL_MOVE_TIME = 1.2
try:
while True:
wait_time = random.uniform(0, 60 – (SMALL_MOVE_TIME + 1 + FULL_MOVE_TIME))
print(f"Next motor activation in seconds…")
time.sleep(wait_time)
print("Small motor movement…")
motor_forward(SMALL_MOVE_TIME)
time.sleep(1)
print("Motor spinning for one full revolution…")
motor_forward(FULL_MOVE_TIME)
remaining_time = 60 – wait_time – (SMALL_MOVE_TIME + 1 + FULL_MOVE_TIME)
time.sleep(remaining_time)
except KeyboardInterrupt:
print("\nStopping motor and cleaning up GPIO…")
GPIO.cleanup()
What this does is make the motor activate randomly once per minute, with a short twitch followed by a full spin. It’s basic, but it proves the point. The motor moves, it does what it’s told, and nothing catches fire. A success in my book.
What I’d Do Differently
Next time I’d solder female jumper leads to everything instead of trying to hardwire wires directly. It makes it much easier to reuse parts or reconfigure things later. I’d also spend a bit more time planning the layout so I wasn’t trying to hold three wires in place while prodding a soldering iron with my chin. And I’d think more carefully about where I was going to do the work. If you don’t have a permanent setup, just the effort of unpacking everything becomes a barrier.
What’s Next
Now that I’ve got it all moving, I want to make the Pi run independently of mains power. I’d like to get it off my Wi-Fi and have it operate standalone. I’m also thinking of building a system that monitors something in the tropical fish tank and sends an alert if anything’s outside normal parameters — a drop in temperature, light levels, that kind of thing. Something useful, not just novelty. Although the novelty bit is fun too.
This whole thing started because I wanted to make a motor spin, but it turned into a lesson in how everyday objects are quietly full of clever design. It’s satisfying to learn how it works. And even more satisfying when you plug something in, hear the whir of a motor, and realise it was your code that made it happen.

“I highly recommend Ben for any leadership role. He’s a standout people leader and a strong asset to any organisation.” – Todd Sproule, Principle Developer
Raspi FAQs
Yes, one of the big advantages of using a Raspberry Pi for motor projects is the ability to control both speed and direction. Direction control is achieved by reversing polarity through an H-Bridge driver. This means the motor can spin clockwise or counter-clockwise on command. Speed control is usually handled through Pulse Width Modulation (PWM). The Pi can send a rapid on-off signal to the driver, which translates into varying amounts of power reaching the motor. A higher duty cycle (more “on” time) equals faster speed, while a lower duty cycle slows it down. Many Python libraries, such as RPi.GPIO or gpiozero, make implementing PWM simple for beginners. By combining PWM for speed and H-Bridge switching for direction, you can create robots, fans, or even automated vehicles. These techniques form the foundation of more advanced robotics and IoT projects, giving you flexible and precise control without complex hardware.
A common question for beginners is whether the Raspberry Pi can power a motor directly. The short answer is no — at least not safely. The Raspberry Pi’s GPIO pins only supply a very small current, around 16mA per pin, with a maximum across all pins of roughly 50mA. A motor typically requires far more current to start and run, especially under load. Connecting a motor directly risks damaging the Pi’s delicate circuitry. Instead, the recommended approach is to use a motor driver or H-Bridge. These components act as intermediaries, allowing the Pi to control the motor without supplying the actual driving current. Think of the GPIO pins as giving instructions, while the driver handles the heavy lifting. External power supplies are often required depending on motor type and voltage. By setting things up correctly, you protect your Pi and gain precise control over speed and direction.
Absolutely, learning about the Raspberry Pi is one of the most accessible entry points into electronics and programming. The unit itself is inexpensive, with starter kits available for less than the cost of a night out, and additional components like motors, sensors, and breadboards are also budget-friendly. Beyond the low price, there is a vast library of free tutorials, forums, and videos online. Whether you prefer step-by-step written guides, YouTube demonstrations, or community discussions, you’ll find a huge amount of support to get you started.
The official Raspberry Pi Foundation provides structured projects that walk you through everything from blinking LEDs to building robots. These exercises not only keep learning fun but also give you a solid foundation in coding and hardware control. With resources like the Raspberry Pi Beginner’s Guide, you’ll have hours of experiments at your fingertips — enough to take you from total novice to confident hobbyist.
In short, Raspberry Pi makes technology accessible to everyone, regardless of age or background. With a small investment and a bit of curiosity, you’ll quickly unlock a world of practical skills and creative projects.
Liked this…? You’ll Love These!
If you’ve enjoyed reading about the above with a coffee, you might want to explore some great Pact Coffee varieties I’ve tried. From the smooth, chocolate-toned Pau D’alho from Brazil, to the bright blackcurrant notes of Colombia’s El Vergel, and the refreshing mandarin-and-honey sweetness of Honduras’ El Laurel, each brings its own unique character to the cup. My favourite, however, is still the Bourbon Cream Espresso I first tasted at Lendscape. You can find my full tasting notes for each and decide which one might be your next brew. And remember, if you’re new to Pact, you can get money off your first order by using code PACTPERK at checkout. It’s a great way to discover your next favourite coffee while saving on your first bag.


Pact coffee voucher code first order
Looking to save on your first order? You can get fresh speciality coffee delivered straight to your door with Pact Coffee and enjoy a discount using our exclusive PACTPERK code. This Pact Coffee voucher is the perfect way to try their roast-to-order beans without paying full price, and it works on any of their coffee plans. Whether you’re browsing for a new favourite single origin or a limited microlot, this Pact Coffee promo code gives you money off your first order so you can experience barista-quality coffee at home for less.